In this article series we will look at the steps in creating a Whirr base instance which will be used to launch the Hadoop cluster over your custom created instances ”using AWS VPC – BYON(Bring Your Own Network)”, ie., on pre-setup machine instances in AWS VPC.
In this article we will focus on how to install whirr in the Whirr Based & how to launch the hadoop cluster
As discussed in the Part 1, we should have a whirr base with the whirr tar deflated in the Ubuntu home directory.
Step1: Next step is the log on to get whirr in path.
You can use other ways of adding to path as well, here we will create “Soft link” to the whirr file into /usr/bin
$ sudo ln –s /home/ubuntu/whirr-0.8.1/bin/whirr /usr/bin/whirr
Now enter
$ whirr version

This should return the Apache whirr & jclouds version.
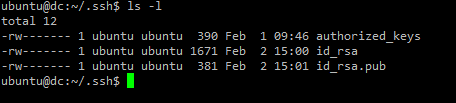
Step2: Create a ssh key for hadoop cluster
Create a ssh key pair by using the below command. This should generate id_rsa and id_rsa.pub in the .ssh folder under the current user home (/home/Ubuntu/.ssh)
$ ssh-keygen -t rsa -P ''
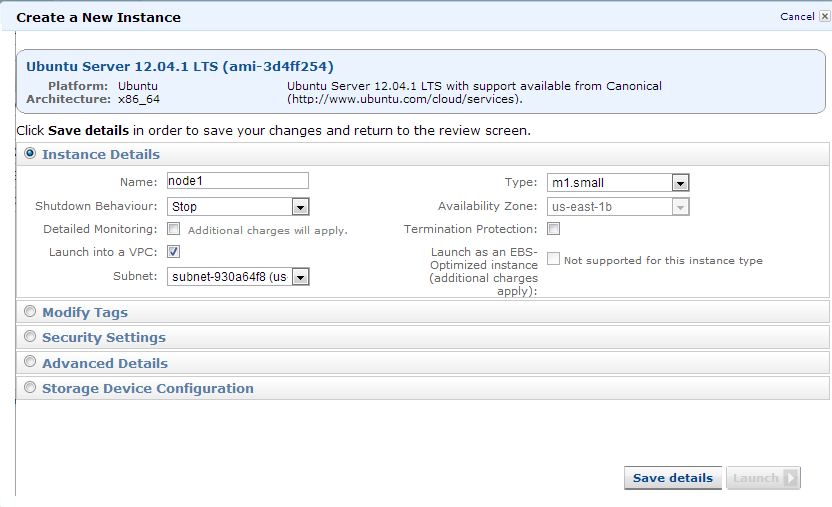
Step3: Next step is to launch the Amazon EC2 VPC instance for hadoop cluster
Recollect in the earlier article(Part 1) we had defined 3 dns names and ip address for our hadoop clusters. We will launch a hadoop cluster with 1 master(jobtracker + namenode) with 2 workers (tasktracker + datanode).
So we need to launch 3 instances with the desired machine size into the subnet of the VPC where the ‘whirr base’ instance is running. We will use the same template of Ubuntu 12.04.1 available as standard with Amazon.
Note: Use the keypair generated in the above step as the keypair for launching these instances. Meaning import this key into your aws account before you start launching your instances


![]()
Step4: Configure each node with the DNS name and DNS server
Access each of the instance via ssh with the ssh keys and make the following changes each one of them.
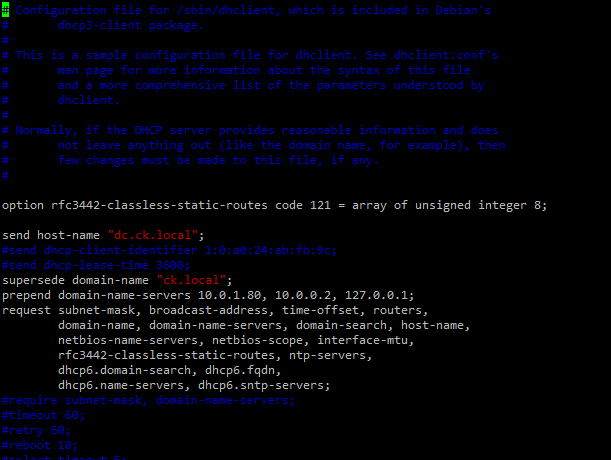
$ sudo vi /etc/dhcp/dhcpclient.conf
Make the changes to update the domain-name as ‘ck.local’ and the domain-name-servers 10.0.1.80 (nameserver ip address)

Now update the hostname to the corresponding hostname configured in the dns server for each of the ipaddress. Note: DNS names used should be exactly the same as used against the corresponding ip address of the instance as configured in the DNS Server. (refer Part1)
$ sudo vi /etc/hostname
Delete the current name entry and update as node1 for instance with ip address 10.0.1.220, one with 10.0.1.221 as node2 and that with 10.0.1.222 as node3. Update save the file and reboot.
$ sudo reboot
Now we are ready for launch of hadoop cluster.
Step5: Configure Whirr for BYON & CDH and launch hadoop cluster
Now that we have all the instances ready for hadoop deployment, it is time to configure the whirr for BYON(bring your own network). Our network as we recollect is as follows
3 instances with Ubuntu 12.04, 64 bit, default sudo user name: ‘ubuntu’
Copy two configuration files from existing whirr installation under ‘recipes’ folder
$ cp whirr-0.8.1/recipes/hadoop.properties ~/cdh-whirr.properties

$ cp whirr-0.8.1/recipes/nodes-byon.yaml ~/cdh-byon.yaml
Now edit the cdh-whirr.properties as below, change the following
whirr.cluster-name=cdh-hadoop

# Change the name of cluster admin user
#whirr.cluster-user=${sys:user.name}
whirr.cluster-user=ubuntu

# Change the number of machines in the cluster here
whirr.instance-templates=1 hadoop-namenode+hadoop-jobtracker,2 hadoop-datanode+hadoop-tasktracker

whirr.hadoop.install-function=install_cdh_hadoop
whirr.hadoop-configure-function=configure_cdh_hadoop

whirr.service-name=byon
whirr.provider=byon
jclouds.byon.endpoint=file:///home/ubuntu/cdh-byon.yaml

Now edit and update the cdh-byon.yaml file for our network.
nodes:
    - id: ubuntu1
      hostname: 10.0.1.220
      os_arch: x86_64
      os_family: ubuntu
      os_description: ubuntu
      os_version: 12.04
      group: ubuntu
      username: ubuntu
      credential_url: file:///home/ubuntu/.ssh/id_rsa
    - id: ubuntu2
      hostname: 10.0.1.221
      os_arch: x86_64
      os_family: ubuntu
      os_description: ubuntu
      os_version: 12.04
      group: ubuntu
      username: ubuntu
      credential: file:///home/ubuntu/.ssh/id_rsa
    - id: ubuntu3
      hostname: 10.0.1.222
      os_arch: x86_64
      os_family: ubuntu
      os_description: ubuntu
      os_version: 12.04
      group: ubuntu
      username: ubuntu
      credential: file:///home/ubuntu/.ssh/id_rsa

That is it we are now ready for launching our cluster.
Step6: Launch CDH hadoop cluster through whirr
Execute the below command from /home/ubuntu as ubuntu user.
$ whirr launch-cluster --config cdh-whirr.properties
This will take time and finally you should get the confirmation message as below with the URL to access the Namenode status and JobTracker status as below.

With that we have the CDH hadoop cluster launched via Whirr using BYON into Amazon AWS VPC.
Job Tracker
![]()
Name Node

TaskTracker
![]()
Note: Now you can stop, start instances as need be for any development / testing needs of hadoop cluster.
References:
Part 1: https://cloudkinetics.wordpress.com/2013/02/04/hadoop-cluster-using-whirr-byon-in-aws-vpc/
https://ccp.cloudera.com/display/CDHDOC/Whirr+Installation#WhirrInstallation-Destroyingacluster